Nyt on uutiskynnys ylitetty.
Minä nimittäin ratkaisin luomivärimysteerin! Eli siis tajusin jotain todella merkittävää luomiväreistä ja meikkaamisesta. Opin tempun, jolla saa luomivärit asettumaan kauniisti raskaille luomille tai syvällä oleville silmille. Omissa silmissä on melko vähän näkyvissä olevaa liikkuvaa luomea. Ihan pieni rako vain. Joten luomivaon varjostaminen, niin kuin tyypillisesti opetetaan, ei ole ikinä toiminut minulle. Oikeastaan mitkään tyypilliset säännöt eivät tunnu oikein ikinä toimivan minulle.
Ja vaikka olenkin ammattilainen, olen paininut oman silmänmuotoni kanssa. Toisinaan onnistun ja meikki asettuu juuri täydellisesti, mutta suurimman osan ajasta olen tehnyt hakuammuntaa, enkä ole tarkalleen ymmärtänyt, miksi meikki näyttää joskus tosi hyvältä ja toisinaan vähän siltä, niin kuin jotain puuttuisi. Okei, sain tämän asian kuulostamaan todella vakavalta. Mutta oikeastaan se onkin! On kyse elämästä ja kuolemasta – luomiväreistä, elämästä ja kuolemasta.
Mennään siis visuaaliseen osioon. Opetan teille kuinka tarkalleen luomiväri kannattaa levittää raskaille luomille, syvällä oleville silmille, monolideille tai ihan vain silmille, joissa on vähän liikkuvaa luomea näkyvissä. Vinkki on myös aika universaali ja toimii kaikille, jotka haluavat silmänsä näyttävän isommilta.
Ja voisin vielä lisätä, ihan vaatimattomasti, että tämä on paras luomivärivinkki, jonka olen koskaan blogissani jakanut.
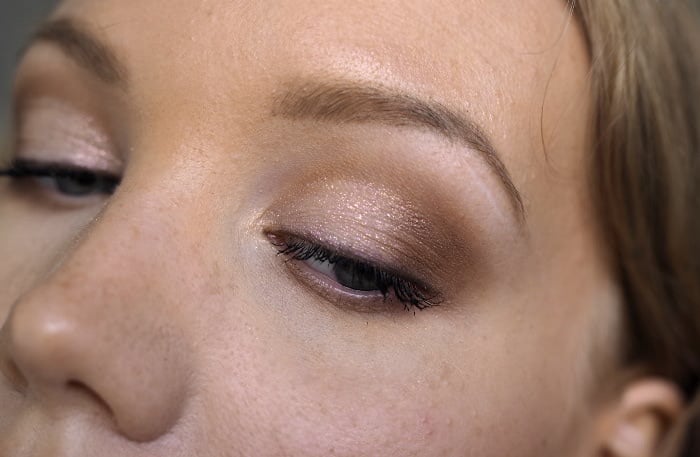
Ultimaattinen meikkivinkki raskaille luomille & syvällä oleville silmille
Unohda luomivako
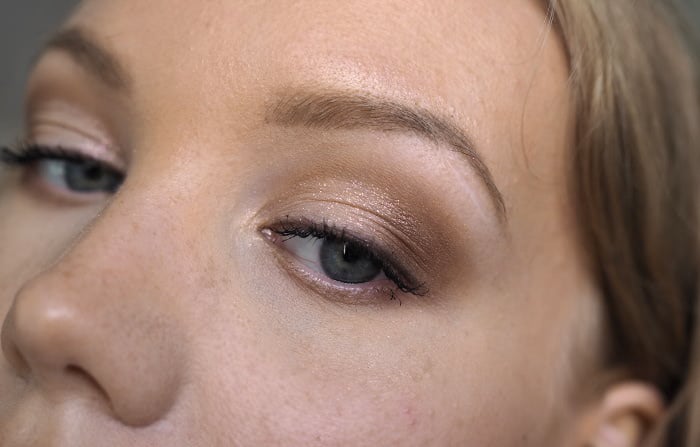
Kuten kuvista näkee, omassa silmässä luomivako on todella alhaalla. Meidän tiemme ovat eronneet oikeastaan aikapäiviä sitten. Luomivaon varjostaminen kun saisi ainoastaan silmäni näyttämään pienemmiltä ja vaikka ne ovatkin juuri hyvän kokoiset, en halua niiden olevan yhtään pienemmät. Joten, unohda luomivako.
Seuraa luustosi rakennetta
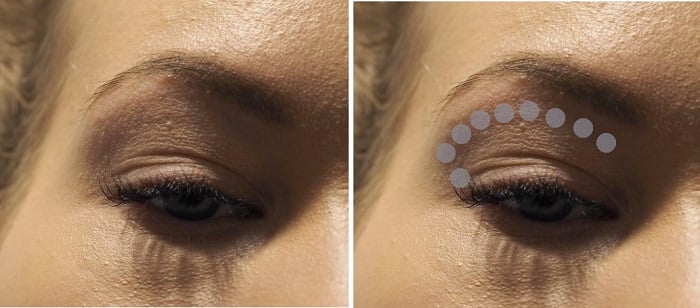
Kuinka levittää luomiväri silmälle kuin silmälle? Seuraa luonnollista rakennetta, jonka luustosi tarjoaa – ihan niin kuin varjostuksia ja korostuksia kasvoillekin tehdessä. Se ei eroa siitä juurikaan! Kyse on siitä, että hyödynnetään niitä valoja ja varjoja, jotka muodostuvat kasvoille tai silmiin luonnollisestikin. Eli tässä tapauksessa hyödynnetään varjoa, joka ilmestyy kulmaluun alle.
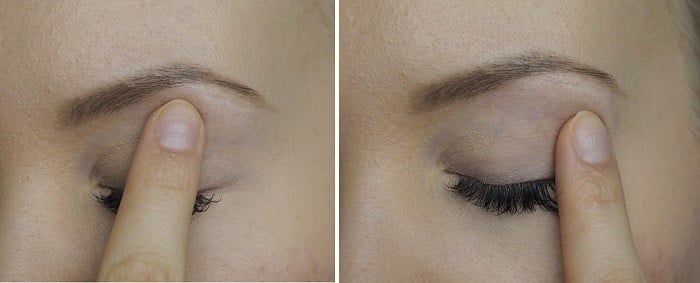
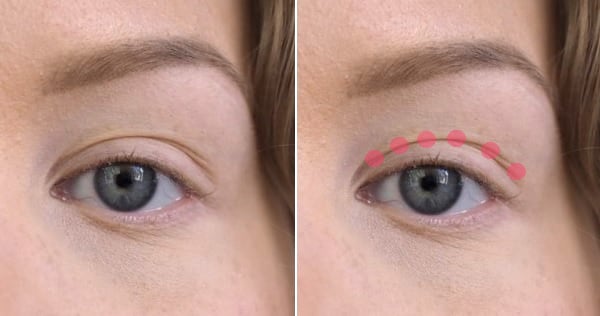
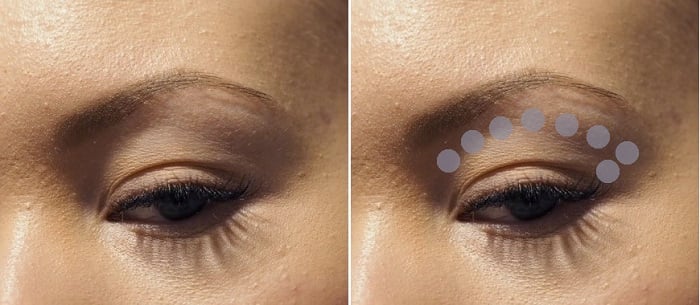
Löydä luonnollinen kohta varjolle – se on heti kulmaluun alla
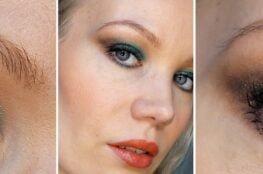
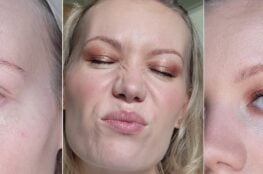
Saadaksesi tämän varmasti oikein, täytyy löytää oikea kohta. Voit etsiä sen tunnustelemalla sormella – tunnet missä luu loppuu ja silmä ikään kuin uppoaa hieman. Tai voit mennä valaistukseen, jossa näet minne varjo tarkalleen silmässä piirtyy. Sillä tavoin näet sen todella tarkasti, kuten kuvista huomaa. Itse olen oikeasti kipittänyt sivellin kädessä eteiseen tuohon kuvissa näkyvään valaistukseen, piirtänyt luomivärin tarkalleen varjon kohdalle ja palannut sitten meikkipöydän ääreen, kun niin sanotut rajat on selvät.
Syy siihen, miksi tämä kikka saa luomivärin näyttämään paremmalta on se, että se istuu silmään paremmin. Koska seuraamme luonnollista rakennettamme, meikki näyttää vähän siltä, kuin se kuuluisikin sinne. Eikö? Jopa häivytys näyttää pehmeämmältä tällä tavoin – ikään kuin luusto antaisi extraboostin sille (yllätys yllätys: se antaa).
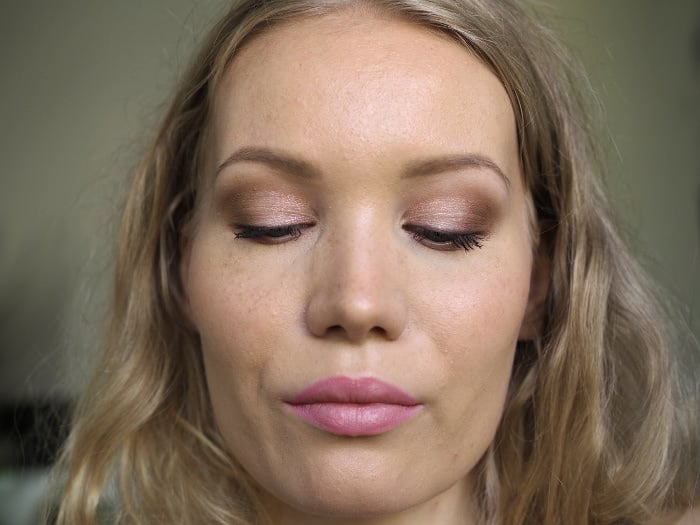
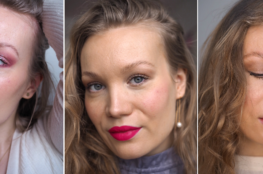
Tässä todella yksinkertainen meikkitutorial käyttäen hyödyksi tätä kikkaa.
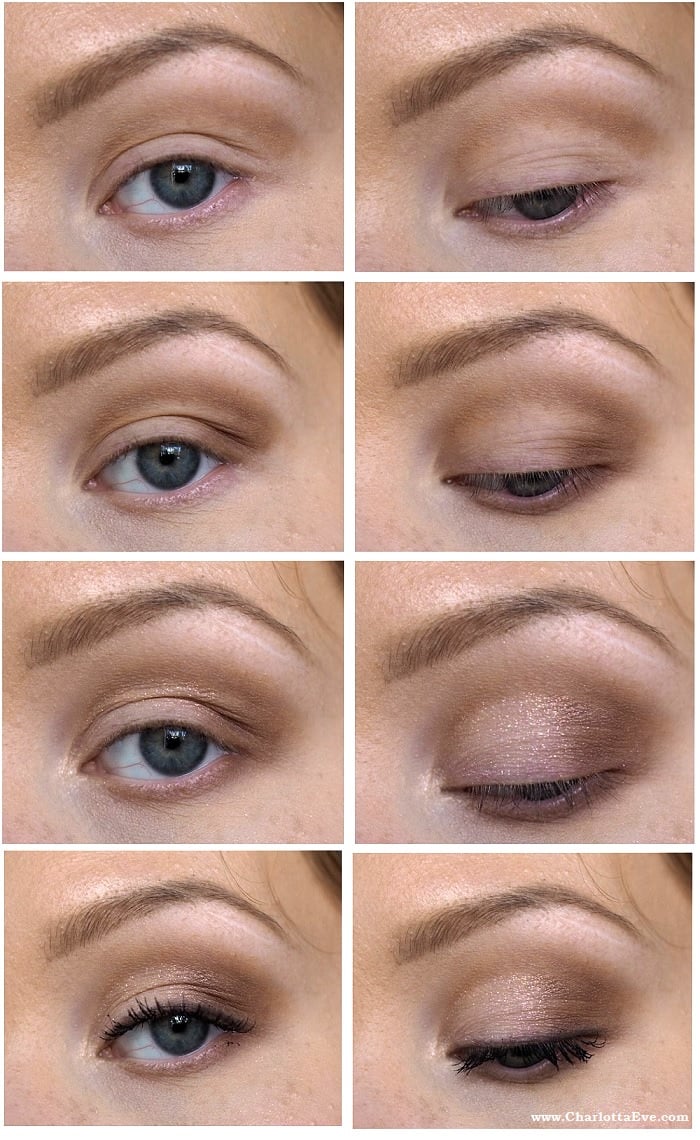
- Varjosta silmää seuraamalla luuston rakennetta. Käytä mattaista sävyä. Tee ‘luomivako’ siihen kohti, mihin ilmestyy luonnollisesti varjo. Sen tulisi olla luomivärin tummin kohta. Täytä väri ulkonurkasta niin, että se näyttää pehmeältä ja hyvin häivytetyltä. Lisää samaa luomiväriä myös kevyesti alaluomelle (tai vahvemminkin, jos tykkäät draamasta).
- Lisää valitsemasi väri luomelle aina varjostukseen saakka. Häivytä rajat varovasti. Älä kuitenkaan sotke helmiäistä (mikäli käytössä on sellainen) mattaiseen sävyyn, koska varjostussävyn pitäisi olla matta.
- Lisää sisänurkan korostussävy, rajaa halutessasi silmät ja lisää ripsiväri.
Suosikkiluomiväripalettejani – tuotesuositukset:
*Norvina paletit
Kalliimpia, mutta erittäin laadukkaita paletteja.
*Naked paletit
Näissä klassikkopaleteissa on hyvä hinta-laatusuhde.
*IsaDora Eye Shadow Palette
Edullinen vaihtoehto, IsaDoran luomivärit levittyvät ihanan pehmeästi.
Luomiväripohjustajana toimii aina *Urban Decay Primer Potion. Ilman tuota pohjustajaa en enää luomiväriä laita. Ei olisi järkeäkään, sillä ilman sitä olisi luomiväri saman tien viiruina.
*Zoevan siveltimet
Näillä teen oikeastaan jokaisen meikkini. Parhaat siveltimet!
Toivottavasti postaus oli teille yhtä hyödyllinen kuin tämän jutun tajuaminen itselle. Kertokaa kommenteissa!
Ja hei – ihanaa ystävänpäivää! Vietän itse kotona Riston kanssa illemasta treffi-iltaa illallisen ja kynttilöiden muodossa. Tosi kliseistä, mutta ihanaa.
2018-02-14
I have the same problems with my eye shape so I think this will work really well for me. I’m going to try it! I apply above the crease to give the illusion of it being higher but I think following the bone structure will make it look a lot more natural!
http://ambeautyedit.com – Amy X
2018-02-15
Yeah, do try it and let me know if it works for you! <3
2018-02-14
I have small eyes and I want them to look a little open. I will definitely try this trick that you have shared. Thanks a lot. 🙂
2018-02-15
Glad you found it useful :>
2021-06-02
The best tutorial I’ve seen so far. Thabks for this!
2021-06-02
Happy to hear it, thank you!
2018-02-16
Hyvä vinkki ja itsekin oon kokenut tuon toimivaksi, sillä olen paininut samojen ongelmien kanssa. 😀
http://www.siirikiviharju.com
2018-02-17
Kiitos 🙂
2018-06-18
I wish you had used slightly less neutral colors in the tutorial to make it a bit more easy to see (what’s flattering isn’t always the best teaching tool…), but I’m definitely going to give it a shot! My current eyeshadow game has been needing some help on these seriously hooded eyes.
2018-06-18
Yeah, me too. I’m thinking of updating this tutorial with darker colors! I hope this helps you x
2022-06-22
Hi- can you tell me what eye shadows you used for this look?
2022-06-30
Hi! Yeah, I used Too Faced Semi Sweet Chocolate Bar Palette.
2018-09-02
Thanks for sharing this! I found it helpful. I have almost no visible lid when my eyes are open, so I have been frustrated trying to figure out how to have fun with all these cool eyeshadows I see people using!
2018-09-02
So glad it worked for you!
2018-09-22
I’m going to try this. I have very hooded eyes with no lid space. Do you have a video where you demonstrate this technique?
2018-09-22
Not yet, but I’m thinking of doing one. 🙂
2019-01-05
Thank you, this was indeed helpful. 🙂
But as a very critical person I want to tell you that your eyes are beautiful and your lids have just the right size, bigger would be too much. 🙂
2019-01-07
Glad you found it helpful! Yeah I think all eye shapes are beautiful. Thank you. 🙂
2019-01-11
Fantastic! I will give it a try this weekend:) And if you are ever in Luxembourg, I would gladly pay for a makeup lesson from you.
2019-01-14
Thank you so much! Hopefully it works for you. And thanks for the offer, that’s a huge compliment! 🙂
2019-01-21
This is the single most helpful eyeshadow tutorial for hooded eyes I’ve ever found. THANK YOU! I’ve seen so many people creating beautiful looks, and the way you’ve found to adapt them to those of us with hooded eyes is kind of life-changing. I can’t wait to play with my eye shadow palettes again!
2019-01-21
This comment just made my day. Thank you! I’m so glad you found it useful.
2019-02-12
This is the best tutorial I’ve seen. I’ve been intuitively doing mine above my crease my whole life and lately I was trying to put it IN the crease because that’s how everyone does it and it never looks right. Now, I’m gonna stick with above like you said. Hey, do you do video tutorials? I’d def follow you!
2019-02-13
Thank you so much! Videos are something I’m constantly thinking about, but it just doesn’t feel natural to me… But I could do a few and see how it goes. 😀 Thank you for the support!
2021-08-23
Edit: I do videos quite often on Instagram – > @charlottaeve 🙂
2019-02-20
Looooooved this tutorial! I have struggled forever with my hooded deep set eyes! You are a God send!
2019-02-20
Thank you, happy to hear it!
2019-08-04
I have a bit hooded and really deepset eyes. It’s a great tutorial, I want to try it. But above my crease immediately there is my brow bone. Should I do something different?
2019-08-12
Try and leave the tiniest gap between your eyebrow and the eyeshadow, so that the color doesn’t start straight from the brow. Hope this helps!
2019-10-04
Thank you so much! I have deep-set eyes and have never been able to figure out eye makeup. Even when I’ve gotten it done by pros for weddings and such, the dark colors or where they put the eye shadow just kind of over crowds my eyes. And whenever I do my own, it looks like someone punched me 😛 Can’t wait to try this tutorial.
My lids are a little wider on the inside corner of my eyes than on the outside, which also makes it tricky for eyeliner. Any suggestions for that?
2019-10-07
Glad you found it useful! 🙂 I would try balancing out the lid by making the liner a little thicker on the inside corner? Or contour the lid from above to make it match with the rest of the lid.
2020-01-16
Great!! What colors did you use in the palette? Looks beautiful!
2020-01-20
Pretty sure I used at least Coconut Creme, Mousse, Butter Pecan, Truffled and Pink Sugar. But my palette is the Semi Sweet version, which is no longer sold. Similar options can be found on the original palette though 🙂
2021-05-07
Thanks! I’ve been watching a lot of videos on YouTube about hooded lids, but this is more helpful since I think my eyes are really deep set too. I was already trying to go above the crease, but now I realize I have to take this even further (dear lid crease – I’m breaking up with you!). I wear glasses as well, so any added tips you have for that would be much appreciated. 🙂
2021-05-07
So happy to hear that you found it helpful. My mentality is that all makeup is suitable for glasses. Though I understand that glasses can hide the makeup a bit.. I will try and come up with some more makeup tips for glasses.
Currently I have these posts:
3 simple makeup tips for glasses wearers
Classic makeup for glasses wearers
Thank you for commenting! 🙂
2021-12-22
This tutorial was very helpful. Merry Christmas to you! x
2021-12-22
So happy to hear that, thank you! Merry Christmas 🙂
2023-11-22
[…] my eyes are deeper set, I follow a specific technique of applying eyeshadow. Essentially, put a lighter color on the inner half of your eyelids, and a […]
2024-01-18
Your posts are a godsend… I am 28 years old and after years of thinking eye makeup just didn’t look good on me, found out I have deep-set eyes thanks to your posts and now the way I am doing my makeup…. it finally looks good! Thank you so much for sharing, your techniques are unlike anything else I’ve been able to find online.
2024-01-26
Wow, thank you! This comment literally made my day <3
2024-11-24
This isn’t working for me I’m just thinking of throwing out all my eyeshadow pallettes. I have no visible lid, is just the fold. I tried the shadow trick and the shadows does not appear, I also tried the following the bone structure and the bone “ends” when the crease starts. Idk. This my sign to give up on makeup.
2024-12-03
Then maybe this particular tutorial wasn’t for you, but I would say you can most definitely still wear makeup and enjoy it. 🙂